To Fix The Problem Of “Unfortunately, TouchWiz Home has stopped”
Samsung has been facing a lot of complaints about their TouchWiz Home launcher which has been slowing down their devices. The TouchWiz Home tends to lag and is not very responsive.
A common issue that happens with the TouchWiz Home Launcher is what is known as force stop error. When you get the force stop error, you will get a message that “Unfortunately, TouchWiz Home has stopped.” If this happens, your device hangs and you’re going to need to restart it.
The simplest solution to get rid force stop error and the other issues is to get rid of TouchWiz and just find and use another launcher from the Google Play Store, but if you do that you will lose the stock touch, feel and look of your Samsung device.
If you don’t feel like getting rid of TouchWiz, we have a fix you can use for the force stop error. The solution we’re going to give you will work on all of Samsung’s Galaxy Devices regardless of whether it is running Android Gingerbread, JellyBean, KitKat or Lollipop.
Fix “Unfortunately, TouchWiz Home has stopped” On Samsung Galaxy
Method 1:
- Boot your device into safe mode. To do so, first turn off it of completely then turn it back on while keeping the volume down button pressed. When your phone boots up completely, let go of the volume down button.
- On the bottom left, you will find “Safe Mode” notification. Now that you are in safe mode, tap the app drawer and go to settings app.
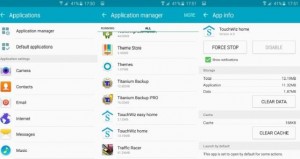
- Open the application manager and then go to Open all applications > TouchWizHome.
- You will now be in TouchWiz Home settings. Wipe data and cache.
- Reboot device.
Method 2:
If the first method does not work for you, try this second method which requires you to wipe your device cache.
- Turn your device off.
- Turn it back down by first pressing and holding down the volume up, home and power keys. When the device boots up let go of the three keys.
- Use volume up and down to go to the Wipe Cache Partition and select it by using the power key. This will wipe it.
- When the wipe is through, reboot your device.
Have you fixed this issue in your Galaxy device?
Share your experience in the comments box below.
JR
[embedyt] https://www.youtube.com/watch?v=W4O6WayQcFQ[/embedyt]



Did both of these.It worked.
Thanks
You are welcome!
Glad to know that the above guide solved the issue.
Why not share this helpfull guide with your contacts of colleagues, friends and family.
This was not the first article I read on how to solve this problem. I followed another’s advise to “clear data”. Doing so made me lose the look I’d been used to on my screens as well as now have large ads on every page of my screens.
I’ve since installed Samsung…..launcher and am setting up the icons I want on my screen pages but I am still getting ads.
Is there any way to get “touchwiz home” launcher back?
Thank you
You should be able to reset and start over.
carefully following the easy step by step guide above.
This should work !
I have tried both methods today on my Samsung Galaxy A3 and none of them made the problem go away :-(.
Any other ideas?
You should be able to reset and start over the process.
Best to carefully follow the easy step by step 2 best working methods above.
This should work !
sama ilmoitus “TouchWizin koti suljettu”.
Tein kummatkin 2 vaiheetta.
Kiitos
Tried both methods,they both worked.
Thanks
Bonjour,
J’ai un A5 (2016). Ce TouchWiz n’arrête pas a s’arrêter. J’ai fait ces manipulations plusieurs fois même réinitialisé le téléphone aussi plusieurs fois, rien y fait : je doit redémarrer le téléphone 2 à 3 fois par jour. C’est un A5 reconditionné.
Je l’ai retourné au magasin, il est encore sous garanti, mais le technicien me dit qu’il n’a rien pu trouver de mal et de toute façon les applications ne tombent pas sous garantie ! Pour moi, c’est comme vendre un ordinateur avec un défaut de la programme qui fait marcher le touchpad ou le souris ! Rien à voir avec une “application”.
Eine Anwendung erschien mir nicht, wo die Fehlermeldung angezeigt wurde, dass sie gestoppt wurde, aber beim Durchsuchen der Anwendung wurde sie nicht bestätigt.