To proceed root Samsung phone using CF-Auto-Root in Odin, you need to follow a set of instructions that we have provided below. CF-Auto-Root is a popular method for rooting Samsung devices, and Odin is the tool used to flash the root file. By following these instructions, you will be able to root your Samsung phone and gain complete access to your device’s system files. Here are the steps to get started.
Samsung’s Galaxy series is a popular choice for Android developers. With new customizations constantly being developed, owning a Galaxy device means you’ll never get bored.
Thanks to Android’s open nature, developers have the freedom to experiment with the operating system and push the boundaries. This allows for enhancements to performance, battery life, and the addition of new features.
To do something unique, you may have to bend the rules. With root access on your device, you can do just that.
An Introduction to Root Access
Before we get started, let’s define root access. Root access refers to the main system access of your Android Galaxy smartphone. Manufacturers typically lock the system for the safety and security of user data. However, when used properly, root access can be advantageous without causing damage to your device.
There are various methods to gain root access on your Android smartphone. Once you have root access, you can unleash the full potential of your device by installing root-specific applications. These apps can drastically improve the performance of your device. Check out some popular root-required applications to get a better idea of the possibilities.
CF Auto Root
If you’re interested in rooting your Samsung Galaxy smartphone, you’re in luck. Thanks to developer Chainfire’s small script, CF-Auto-Root, most Samsung Galaxy devices can be rooted in a matter of seconds using Odin. With hundreds of devices supported and firmware compatibility, rooting has never been easier. While we’ve previously posted individual guides for rooting specific devices, we’ve received requests for a more generic guide which is available now.
Rooting Samsung Galaxy using CF-Auto-Root in Odin.
Our guide will show you how to easily root your Samsung Galaxy device, running any firmware from Android Gingerbread to Android Lollipop, and even the upcoming Android M. To accomplish this, we’ll use the help of CF-Auto-Root and Samsung’s tool, Odin3. CF-Auto-Root comes in .tar file format and can be easily flashed in Odin.
Protective steps
- Ensure that you download the correct CF-Auto-Root file for your Galaxy smartphone by double-checking the model number. You can find your device’s model number in the Settings menu under About Device or General/More > About Device.
- As a safety measure, it is recommended that you backup important contacts, call logs, SMS messages, and media content.
- To prevent power-related issues during the rooting process, ensure that your phone is charged up to 50%.
- Disable Samsung Kies, Firewall, and Antivirus programs while using Odin3.
- Enable USB debugging on your Samsung Galaxy device.
- To establish a connection between your phone and computer, use the original data cable.
- For a successful rooting process, follow this guide precisely.
Disclaimer: Rooting is a custom process that comes with certain risks and voids your Samsung Galaxy’s warranty. Rooting with a Knox bootloader will trip the counter, and once tripped, it cannot be reset. Techbeats, Samsung, or Chainfire cannot be held responsible for any mishaps that may occur, thus it’s important to fully understand the process and proceed at your own risk.
Mandatory programs:
- You need to download and install Samsung USB drivers
- Download and extract Odin software.
- Carefully download the CF-Auto-Root file specific to your device and extract it only once.
Root Samsung Phone using CF Auto Root
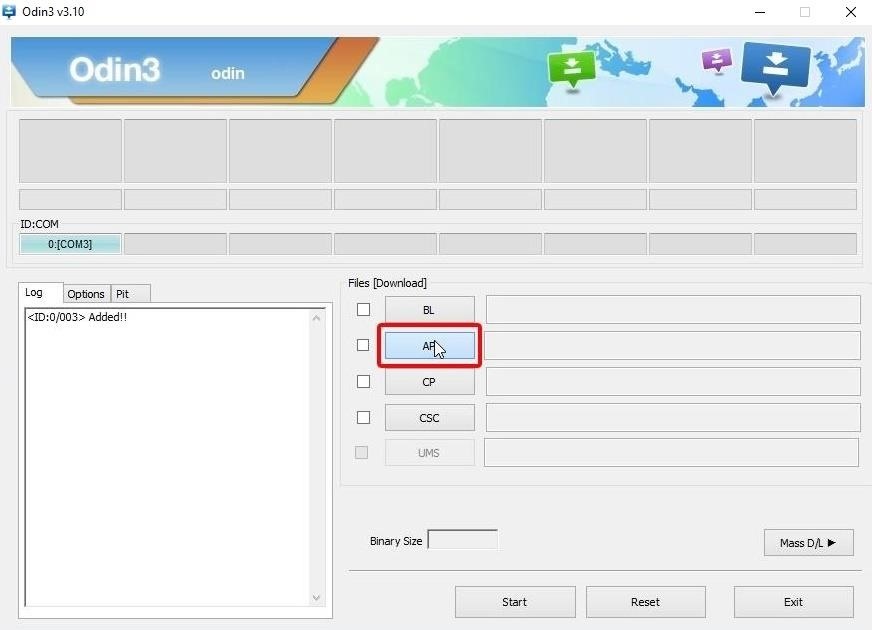
1: Open Odin.exe from the extracted folder.
2: Click on the “PDA” / “AP” tab, then select the unzipped CF-Auto-Root file (in tar format) downloaded in step 3 of the Required Downloads section. No need to extract if the file is already in tar format.
3: Only tick the “F.Reset Time” and “Auto-Reboot” options in Odin and leave the others untouched.
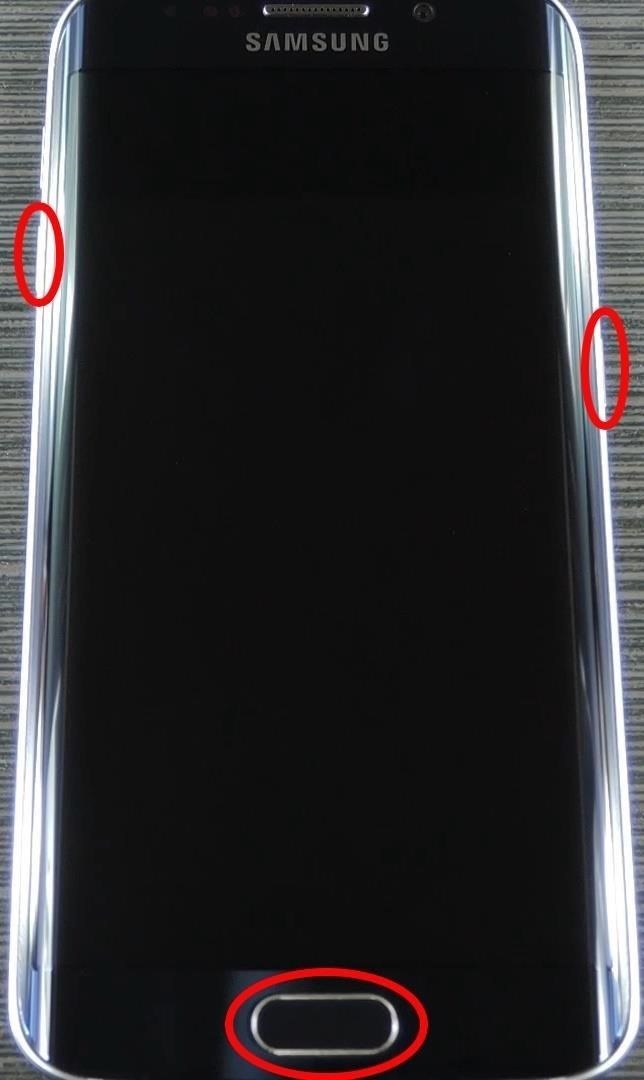
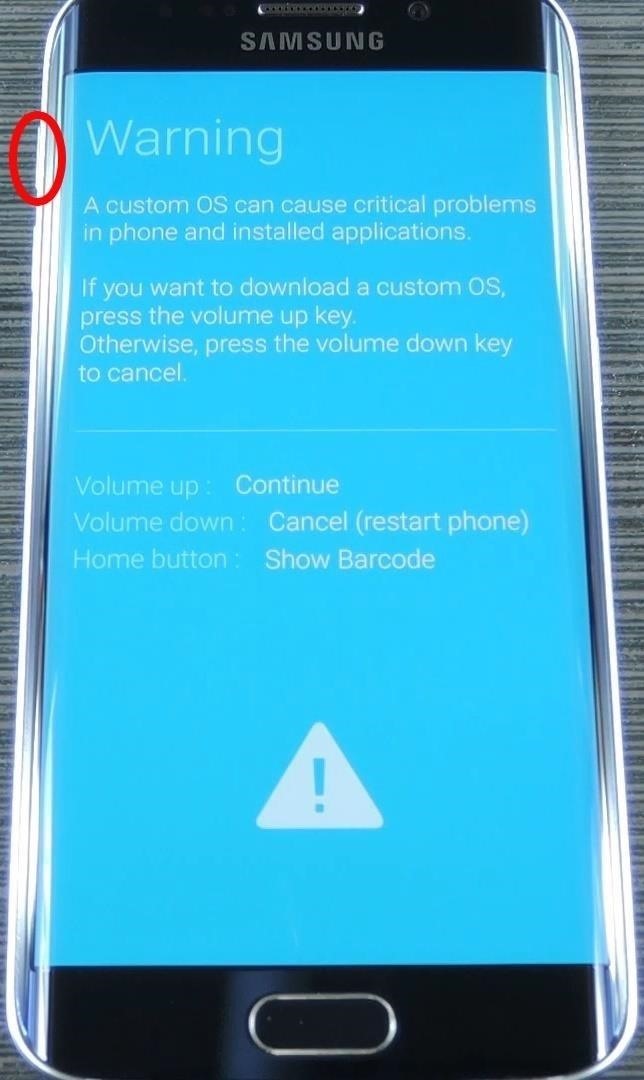
4: To begin, turn off your Galaxy phone and enter download mode by pressing and holding the Volume Down + Home + Power Key. Once the warning appears, press Volume Up to continue. Connect your device to your PC, and if the combination does not work, refer to How to Boot Samsung Galaxy Devices into Download & Recovery Mode.
 |
 |
5: Connect your phone to your PC, and wait for Odin to detect the device. Upon detection (indicated by a blue or yellow ID: COM box), continue.

6: Now that your device is connected, click the “Start” button.
7: Odin will flash CF-Auto-Root and reboot your device upon completion.
8: After the device has rebooted, disconnect it then check the app drawer for SuperSu.
9: Install the Root Checker app from the Google Play Store to verify root access.
If Device is not Rooted After Booting Up: Here’s What to Do.
If your device remains unrooted after using CF-Auto-Root, you can try the following steps.
- Follow Steps 1 and 2 from the previous guide.
- In Step 3, uncheck “Auto-Reboot” and only “F.Reset.Time” must be selected.
- Follow the steps from 4-6 in the previous guide.
- After flashing CF-Auto-Root, restart your device manually using the battery or button combo.
- Check root access using the previously mentioned method.
What is the process for unrooting?
To revert to the stock condition and unroot your device, flash stock firmware using Odin. Refer to How To Flash Stock Firmware On Samsung Galaxy With Odin,
Feel free to ask questions concerning this post by writing in the comment section below.


