The root Android Phone on Samsung Galaxy S5 was updated to the latest version of the Android operating system, which is the Android 6.0.1 Marshmallow, a few months back. Fortunately, this firmware was made available to almost all variants of the Galaxy S5, making it possible for many subscribers to enjoy the upgraded software. The latest Marshmallow update for the Galaxy S5 has given a new life to this device by introducing a new user interface and a host of new features that have freshened up the user experience.
The following guide helps you regain root Android phone access on your Samsung Galaxy S5 running on Marshmallow. It also explains how to flash the latest TWRP custom recovery to enable the installation of custom apps on your device. The guide applies to all variants of Galaxy S5. Just follow the guide carefully and you’re good to go.

Here are some important points to remember
- Only perform this guide on the specified Galaxy S5 models below. If you try it on any other device, you risk bricking it.
- Make sure your phone is charged to at least 50% to prevent power issues while flashing.
- If your device’s developer options are accessible, turn on USB Debugging and OEM Unlocking. However, if your device is stuck in a particular mode, you can skip this step.
- To be cautious, take a backup of your significant Call Logs, SMS messages, and Contacts.
- If you have launched Samsung Kies on your computer, shut it down.
- In case it is active, deactivate your Firewall and Anti-virus software.
- To link your computer and phone, use an OEM data cable.
- To prevent any mistakes, adhere to this guide closely.
Disclaimer: The mentioned methods in the following guide are highly personalized and not endorsed by device manufacturers. We or the device manufacturers cannot be held accountable for any mishaps that may occur. Proceed at your own risk.
Necessary Downloads
- Download and install Samsung USB drivers.
- Download and extract Odin3 flashtool.
- To get the .tar file, download and extract CF-Autoroot that matches your device.
- Download the latest TWRP Recovery.img.tar specific to your device.
- Download for SM-G900F, SM-G900W8, SM-G900T, SM-G900M, SM-G900P, SM-G900V, SM-G900I devices in International, Americas, and Oceanic regions.
- Download for the International Duos device, SM-G900FD.
- Download available for SM-G9006V, SM-G9008V, SM-G9006W, SM-G9008W, SM-G9009W devices in China and China Duos.
- You can Download for SCL23 and SC-04F devices in Japan.
- Downloads are available for SM-G900K, SM-G900L, SM-G900S devices in Korea.
Root Android Phone on Samsung Galaxy S5
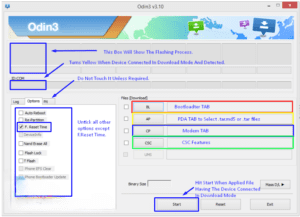
- Access the extracted Odin3 V3.10.7.exe file on your PC and start it.
- Enter download mode on your phone by powering it off, then holding down the Volume Down, Home, and Power keys, and finally pressing the Volume Up button.
- Connect your phone to your PC at the moment, and verify if the ID:COM box on Odin3 turns blue, meaning your phone has successfully connected.
- Go to the Odin and click on the ‘AP’ tab, then choose the CF-Autoroot.tar file, which will take a few seconds to load in Odin3.
- Uncheck the Auto-reboot option if it’s enabled, while keeping all other options in Odin3 as is.
- You’re now ready to flash the root file. Simply hit the start button in Odin3 and wait for the process to complete.
- After the process box above ID:COM box displays a green light and the flashing process is complete, disconnect your device.
- Manually restart your phone now by removing the battery, reinserting it, and turning on your device.
- Check the application drawer for SuperSu and download BusyBox from the Play Store.
- Confirm root access by using the Root Checker app.
- That concludes the process. You are now ready to explore the openness of the Android operating system.
Installing TWRP Recovery on Galaxy with Android 6.0.1 Marshmallow
- Launch the Odin3 V3.10.7.exe file that you previously extracted on your computer.
- You need to put your phone in download mode. To achieve this, switch off the phone entirely, then press and hold the Volume Down + Home + Power Key buttons. When the phone starts up, press the Volume Up button to proceed.
- Now, you should connect your phone to the PC. If your phone is connected correctly, the ID:COM box located in the top-left corner of Odin3 will turn blue.
- Next, select the “AP” tab located in Odin and choose the twrp-xxxxxx.img.tar file. It may take a few seconds for Odin3 to load this file.
- In case the Auto-reboot option is selected, unselect it and all other options in Odin3 should be left as they are.
- You are now ready to initiate the recovery flashing process. Simply click the start button in Odin3 and wait for the process to complete.
- After the process box above the ID:COM box displays a green light indicating that the flashing process is complete, disconnect your device.
- Remove the battery from your phone to turn it off.
- Reinsert the battery and boot your device into recovery mode by pressing and holding the Volume Up, Power, and Home keys simultaneously. Your device will then start up in recovery mode.
- You now can carry out any desired actions utilizing the custom recovery. Wishing you the best of luck.
Feel free to ask questions concerning this post by writing in the comment section below.


