
Install CWM Recovery On An AT&T Samsung Galaxy S4
The AT&T version of the Samsung Galaxy S4, the Galaxy S4 SGH-I337, has gotten an update to Android 4.4.2 KitKat. If you’ve have this update in your device, you will have lost any previous custom recoveries you installed and also no longer have root access.
The CF-Auto root method can root the AT&T Samsung Galaxy S4, but CF-Auto root will not support custom recovery anymore. To install recovery, you are going to need to use the Odin or Loki method but these can be complicated. We’ve found an easier way.
In this guide, we’re going to show you our way to install custom recovery and root a Samsung Galaxy S4 SGH-I337 that runs Android 4.4.2 KitKat.
Prepare your phone:
- Make sure that your phone is a Samsung Galaxy S4 SGH-I337. Check by going to Setting>About
- Make sure that your phone runs Android 4.4.2 KitKat
- Backup all your important messages, contacts and call logs.
- Make a backup of the phone’s EFS data.
- Unlock your phone’s bootloader.
- Download USB drivers for Samsung
Note: The methods needed to flash custom recoveries, roms and to root your phone can result in bricking your device. Rooting your device will also void the warranty and it will no longer be eligible for free device services from manufacturers or warranty providers. Be responsible and keep these in mind before you decide to proceed on your own responsibility. In case a mishap occurs, we or the device manufacturers should never be held responsible.
Download:
Install Recovery:
- On your computer, extract CWM Recovery file that you downloaded.
- Now, download Odin.Download Odin3 v3.10.7
- Turn your phone off then turn if back on while pressing the power, volume down and home buttons. When you see text on-screen, press the volume up button to continue.
- Install the USB drivers that you downloaded.
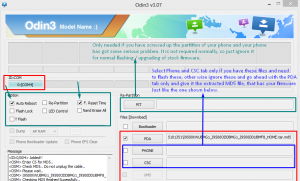
- Open Odin on your computer then connect your phone, in download mode, to the PC
- If you successfully connected your phone to the PC, you will see that the Odin port has turned yellow and a COM port number is displayed.
- Click the PDA tab and select philz_touch_6.08.9-jflteatt.tar.md5.
- Go back to Odin and check the Auto reboot option.
- Click the start button and then wait for the process to finish.
- When installation is done, you phone will restart.
- When you see the Home Screen, unplug the cable and disconnect your phone from the PC.
Flash Super SU:
- Download Super SU to your phone’s root.
- Turn your phone off
- Put your phone into Recovery mode by pressing and holding down the power, volume up and home buttons until you see some text appear on-screen.
- Go to ‘Install zip from SDcard’. You should see another windows open in front of you.
- From the options presented, pick ‘choose zip from sd card’.
- Select Super SU.zip file and then confirm the files installation on the next screen.
- When the installation is through, select +++++Go Back+++++.
- Choose to “Reboot System Now“.
- When your phone has rebooted, check that you have root access by either checking that the Super SU app is in your app drawer or by using a root checker app.
Do have you rooted and installed custom recovery on your AT&T Samsung Galaxy s4?
Share your experience in the comments box below.
JR.
[embedyt] https://www.youtube.com/watch?v=lyHeDMg7MkM[/embedyt]


