This post will guide you on enable or disable Superfetch on Windows 10, 8, and 7.
Superfetch is a feature that caches application data to make it immediately available when you launch an application. However, as we know, caching can be a major issue for performance and this is also true for Superfetch, as it can slow down the system and cause lag. To address this, we need to enable or disable Superfetch.

Enable and Disable Superfetch in Windows
Deactivate:
- Open the Run dialog box by simultaneously pressing the Windows key and the letter “R.
- In the Run dialog box, type “services. msc” and press the “Enter” key.
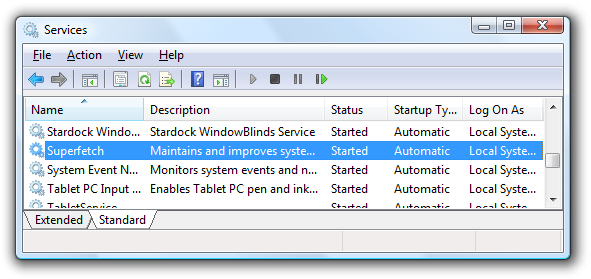
- Find “Superfetch” within the list.
- Perform a right-click on “Superfetch” and then select “Properties“.
- To pause this service, click on the “Stop” button.
- Choose the option “Disabled” from the dropdown menu labeled “Startup type“.
Activate/Deactivate:
- To open the Run dialog box, simultaneously press the Windows key and the letter “R.
- Enter “regedit” in the Run dialog box.
- Elaborate on the items listed below.
- HKEY_LOCAL_MACHINE
- SYSTEM
- CurrentControlSet
- Control
- Session Manager
- MemoryManagement
- PrefetchParameters
Locate “EnableSuperfetch” and double-click on it. If it cannot be found, create a new value using the following method.
Right-click on the “PrefetchParameters” folder.
Select “New” and then choose “DWORD Value“.
You can use any of the following values:
- 0 – To deactivate Superfetch
- 1 – To activate prefetching when a program is launched
- 2 – To activate boot prefetching
- 3 – To activate prefetching for all applications
Choose OK.
It is important to note that while Superfetch can have benefits for most users, such as reducing application load times, it may not be necessary for everyone. Disabling Superfetch may lead to slower application load times initially, as the system will no longer be preloading frequently used applications. However, over time, the system will adapt and adjust to your usage patterns, ensuring efficient resource allocation.
If you find that disabling Superfetch does not improve your system’s performance, you can easily re-enable it by following the same steps and changing the Startup type to “Automatic” or “Automatic (Delayed Start)” in the Superfetch Properties window.
Ultimately, the decision to disable or enable Superfetch in Windows depends on your specific needs and preferences. It is advisable to experiment and evaluate the impact on your system before making a permanent decision.
Learn more on How to update Chrome for Windows 11: A seamless Web and Signature Verification Disable on Windows.
Feel free to ask questions concerning this post by writing in the comment section below.


