Root Access On A T-Mobile Galaxy Avant SM-G386T
Samsung released their Galaxy Avant in July of 2014. The mid-range device is under the umbrella of mobile provider T-Mobile.
The Galaxy Avant comes running Android 4.4.2 KitKat and in order to unleash its true power, you are going to want to root your T-Mobile Galaxy Avant SM-G386. In this guide, we’re going to show you how.
Prepare your phone:
- This guide is only for use with the Samsung Galaxy Avant. Using it with another device could brick it. Check your device model number by going to Settings>More/General>About Device or else try Settings>About Device.
- Charge your battery to at least 60 percent. This is to make sure your device doesn’t lose power before the process is finished.
- Have an OEM datacable that you can use to establish a connection between your phone and a PC.
- Back up you call logs, contacts and important SMS messages
- Back up important media files by copying them to a PC or laptop.
- Samsung Keis, anti-virus programs and firewalls can interrupt Odin3, which you need to flash the file. Turn these files off until you finish the rooting process.
Note: The methods needed to flash custom recoveries, roms and to root your phone can result in bricking your device. Rooting your device will also void the warranty and it will no longer be eligible for free device services from manufacturers or warranty providers. Be responsible and keep these in mind before you decide to proceed on your own responsibility. In case a mishap occurs, we or the device manufacturers should never be held responsible.
Download:
- Odin3 v3.10.
- Samsung USB drivers
- CF-Auto-Root-afyonltetmo-afyonltetmo-smg386t.zip
Root T-Mobile Samsung Galaxy Avant SM-G386T:
- Extract the CF-Auto-Root file that you downloaded. Get the .tar.md5 file you will find there.
- Open Odin3.exe.
- Put your phone in download mode by turning it off and waiting for 10 seconds before turning it on and pressing and holding the volume down, home button and power button simultaneously. When you see a warning, press the volume up button and continue.
- Using the OEM data cable connect your PC and your phone. Make sure that you’ve already installed Samsung USB drivers before making the connection.
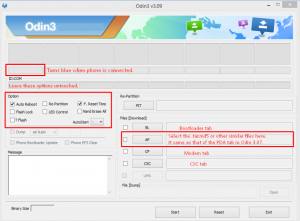
- If you made the connection properly, Odin should automatically detect your device and the ID:COM box will turn blue.
- If you have an Odin 3.09, choose the AP tab. If you have a Odin 3.07, choose the PDA tab.
- From either the AP or PDA tab, choose the CF-Auto-Root.tar.md5, that you had downloaded and extracted.
- Make sure the options chosen in your own Odin match those shown in the photo below.

- Press start to begin the rooting process and then wait for it to complete. When it completes your device should restart.
- When you device restarts, disconnect it from your PC.
- To check that you have rooted it, go to your app drawer and see if you can find SuperSu in it.
Verify root access:
- Go to the Google Play Store
- Find and install “Root Checker“
- Open Root Checker.
- Tap “Verify Root”.
- You will be asked for SuperSu rights, tap “Grant”.
- You should see: Root Access Verified Now!
Have you rooted your Galaxy Avant?
Share your experience in the comments box below.
JR
[embedyt] https://www.youtube.com/watch?v=kK7rMzqvx10[/embedyt]


