
Recovery On A Oppo Find 7a And Root It
Oppo’s Find 7a is a great device. If you want to get one or have one, you are going to want to apply different mods and custom ROMS in it. Before you can do so, you are going to need to root it and install a custom recovery.
In this guide, we’re going to show you how you can install TWRP recovery on a Oppo Find 7a and root it.
Prepare your phone:
- This guide will only work with the Oppo Find 7A. Do not try this with other devices as it could brick them.
- Charge your battery to least over 60 percent to prevent you from losing power before the process ends.
- Install Android ADB and Fastboot drivers.
- Unlock your bootloader.
- Backup all you important contacts, call logs, and sms messages.
- Backup your important media content manually by copying them to a PC.
- Enable USB debugging on your phone by going to Settings>Developer Options>USB Debugging.
- Have an OEM data cable that you can use to establish a connection between your phone and your PC.
Note: The methods needed to flash custom recoveries, roms and to root your phone can result in bricking your device. Rooting your device will also void the warranty and it will no longer be eligible for free device services from manufacturers or warranty providers. Be responsible and keep these in mind before you decide to proceed on your own responsibility. In case a mishap occurs, we or the device manufacturers should never be held responsible.
Install TWRP Recovery and Root Oppo Find 7a:
- Download:
- openrecovery-twrp-2.7.0.0-find7a.img
- zip file and copy to the Find 7a’s internal storage.
- Rename downloaded file to twrp.img
- Place renamed twrp.img file in Minimal ADB and Fastboot folder.
- If you are using Android ADB & Fastboot full package, you can place the downloaded Recovery.img file in Fastboot folder or in Platform-tools folder.
- Open folder where you placed Boot.img file.
- Press and hold shift key and right click on any empty area in the folder. Click “Open Command Window Here”.
- Connect your phone to your PC.
- Type the following commands:
adb reboot bootloader
fastboot flash recovery twrp.img
fastboot reboot
- Your device should now reboot and when it reboots completely, issue the following command:
adb reboot recovery
- You should now be in TWRP recovery.
- In TWRP recovery, select “Install > search for SuperSu.zip > flash it”.
- SuperSu will flash and root your Oppo Find 7a.
- Enter recovery by first turning off your Oppo Find 7a completely, turn it back on by pressing and holding the volume down and power key. You should now be able to see TWRP recovery.
Install busybox now
- Go to the Google Play Store
- Search for “Busybox Installer”.
- Run Busybox installer and proceed with installation.
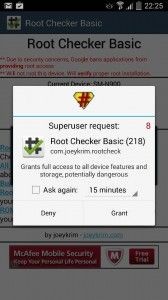
How to check if the device is properly rooted or not?
- Go to the Google Play Store
- Search for and install “Root Checker”.
- Open Root Checker.
- Tap “Verify Root”.
- You are asked for SuperSu rights, tap “Grant”.
- You will see Root Access Verified Now!
Have you installed custom recovery and rooted your Oppo Find 7a?
Share your experience in the comments box below.
JR
[embedyt] https://www.youtube.com/watch?v=8GwHf7Ee5dc[/embedyt]


