Root to Recovery on your Samsung Galaxy device with Odin opens up endless possibilities for customization and optimization. In this guide, we’ll show you how to safely navigate the root-to-recovery process and unlock your device’s full potential.
Rooting is essential for Android users who want complete control over their devices and access to custom features. It’s important to install Custom Recovery for mods, tweaks, and custom ROMs. Rooting and installing Custom Recovery can be challenging, but Samsung users have an advantage with the easy-to-use Odin.
CF-Auto-Root is the easiest and safest way to install root binaries on your device, even better than one-click tools that may brick your device. With Odin, you can simply try the process again, and you’re good to go. CF-Auto-Root not only roots your device but also installs the Superuser APK. This article will show you how to root your Samsung device with CF-Auto-Root and install recovery files. Let’s get started!
Warning:
The process of flashing custom recoveries, ROMs, and rooting your phone is unique and carries a risk of bricking your device. It is not associated with Google or the device manufacturer, such as Samsung. Rooting your device will void the warranty and eliminate eligibility for free services. We are not responsible for any mishap but suggest following the instructions carefully to avoid potential issues. All actions taken should be made at your discretion.
Initial Steps:
- This is exclusively intended for Samsung Galaxy devices.
- Avoid employing Odin for any OEM other than Samsung.
- Ensure that the battery is charged to a minimum of 60%.
- Create a backup of the EFS
- Additionally, create a Backup SMS Messages
- Ensure that you create a backup of the call logs.
- Create a Backup of your Contacts.
- Manually copy your media files to your computer or laptop for backup purposes.
Necessary downloads are required:
- Retrieve and unzip Odin3 v3.09.
- Acquire and install Samsung USB drivers.
- Fetch the link to download the CF-Auto root Package.
- Retrieve the link to download the Recovery Image specific to your device.

Root to Recovery Your Device: Step-by-step Guide
- The CF-Auto Root Package is available as a .zip file. Simply extract it and save the XXXXX.tar.md5 file in a memorable location.
- It is mandatory for the Recovery File to be in the .img format.
- Also, extract and download the Odin file.
- Launch the Odin3.exe application.
- To enter download mode on your Galaxy device, first turn it off and wait for 10 seconds. Then, press and hold the Volume Down + Home Button + Power Key at the same time until you see a warning message. Press the Volume Up button to continue. If this method doesn’t work, refer to this guide for alternative options.
- Link up your device with your PC.
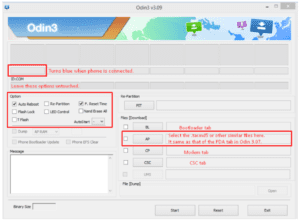
- The ID:COM box should turn blue once Odin detects your phone. Ensure that you have installed Samsung USB drivers before connecting.
- To use Odin 3.09, click on the AP tab and choose the downloaded and extracted firmware.tar.md5 or firmware.tar.
- If you’re using Odin 3.07, you will select the “PDA” tab instead of the AP tab, rest of the options remain untouched.
- Ensure that the settings you have chosen in Odin match the picture exactly.
- After hitting start, patiently wait for the firmware flashing process to finish. Once your device restarts, disconnect it from the PC.
- Be patient and wait for your device to restart, and once it does, take a look at the new firmware!
- That concludes it!
Feel free to ask questions concerning this post by writing in the comment section below.


