The Samsung Galaxy Tab 3
The Samsung Galaxy Tab 3.7.0 is a popular device, especially for kids who are just starting to learn about Android apps. The Tab 3 comes running on Android 4.1.2 Jelly Bean and it doesn’t look like Samsung is going to change that anytime soon.
If you want to update your Galaxy Tab 3, you might want to follow along with our guide. Here, we show you how to get Android 4.2.2 Jelly Bean in your Galaxy Tab 3. Android 4.2.2 fixes a lot of bugs and has some performance enhancements, but the beggest draw is the Multi Window feature that Samsung has recently introduced in the Galaxy S3.
Prepare your phone:
- This guide and the ROM that it will use only works with Galaxy Tab 3 SM-T210 and SM-T210R.
- Check device’s model: Settings > About device > Model.
- The battery has at least over 60 percent charge so you don’t out of power during the flashing process.
- You’ve backed everything up.
- You have an OEM data cable that can connect your phone and a PC.
- Back up your sms messages, call logs, contacts
- Back up important media content by copying to a PC
- If you device is rooted, you can use Titanium Backup for your apps and data.
- Have TWRP Recovery installed.
- Use TWRP to make a nandroid backup.
Note: The methods needed to flash custom recoveries, roms and to root your phone can result in bricking your device. Rooting your device will also void the warranty and it will no longer be eligible for free device services from manufacturers or warranty providers. Be responsible and keep these in mind before you decide to proceed on your own responsibility. In case a mishap occurs, we or the device manufacturers should never be held responsible.
Download:
- T110 on T210/210R.zip [ROM.zip] here
- Kernel zip file
Install Android 4.2.2 Jelly Bean on Galaxy Tab 3 SM-T210/T210R:
- Copy the files downloaded above to your phones external storage or the internal SDcard.
- Boot into your custom recovery.
- While you are in custom recovery, wipe factory data.
- Install> Choose Zip > locate the file from where you placed it > Choose Kernel.zip file
- Go back to main menu of custom recovery
- Install> Choose Zip > locate the file from where you placed it > Choose ROM.zip file
- Complete installation of ROM.
- When installation is finished, reboot the device.
- The first boot may take a few minutes so just wait. When you see the screen you will know that you’re done.
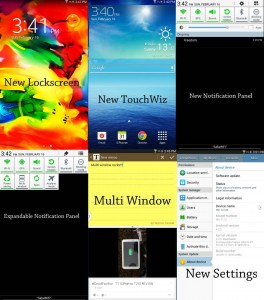
Here are a few screenshots from this new ROM.

So now you have Android 4.2.2 Jelly Bean on the Galaxy Tab 3.
Share your experiences with us in the comment box below.
JR.
[embedyt] https://www.youtube.com/watch?v=LL06ShR48bA[/embedyt]


posso prendere l’apk del multiwindows ed installare solo quella su la jelly bean stock del tab 3?
c’è una maniera di instlalare il multiwindows sul firmware stock JB samsung?
ho gia i permessi di root.
Carefully follow the how to guide above.