
How to Make Background Transparent in Paint. In this article, I’ll guide you through the process of making a background transparent using Paint, specifically referring to Microsoft Paint, a widely-used program familiar to many from experience.
MS Paint is an accessible editing tool used by a vast number of people. What’s great is that you don’t need to be an expert to navigate it effectively. A lesser-known feature is the ability to render backgrounds transparent within the program. Firstly, rest assured, this is achievable. Secondly, I am going to walk you through the steps to accomplish this task. Creating images with transparent backgrounds is perfect for overlapping onto other pictures, but typically, MS Paint doesn’t support saving with transparent backgrounds—something we’ll address in the tutorial.
Let’s begin the tutorial where I’ll teach you the method to create transparent backgrounds in MS Paint. Please pay close attention and follow all the instructions provided.
How to Make Background Transparent in Paint: Guide
- Select the Windows icon, then in the search box, type ‘Paint’ and press enter. This action will open MS Paint.
- After MS Paint has opened, proceed to load the photograph or image that you intend to edit.
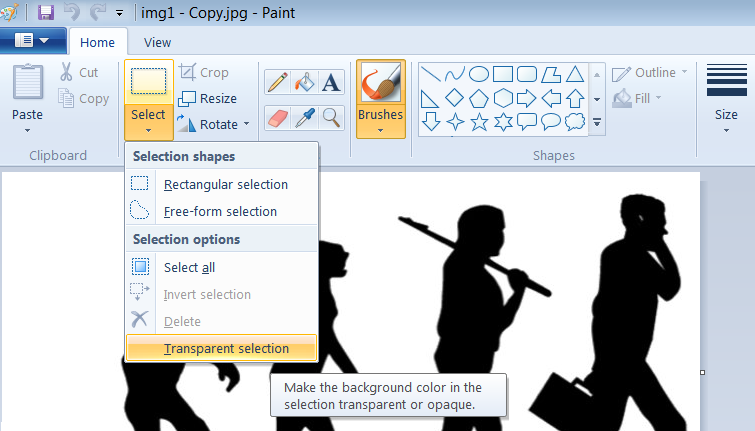
- In the toolbar, go to the “Image” tab and then click on “Select.”
- At this point, you should select the “Free-form selection” option.
- To make the background transparent, ensure that the “Transparent Selection” option is enabled.
- At this crucial stage, after activating the free-form selection tool, meticulously trace around the specific element you wish to extract from the image. Be diligent to omit any parts you do not wish to include. It’s important to maintain a continuous trace without releasing the mouse button or touch until the selection is fully complete.
- After completing the tracing, you’ll notice that the area you’ve outlined will be enclosed within a rectangular selection box. The next step is to simply click on any part of the selected area and click on ‘CUT’ to remove it from the image.
- Now proceed by opening the image where you wish to place the traced element. You can paste the portion you’ve just cropped by using the ‘CTRL+V’ shortcut. Just open the destination image and paste the traced element onto it.
And that concludes the process.
Learn more on How to Edit Pictures on Mac/PC Adobe Photoshop.
Feel free to ask questions concerning this post by writing in the comment section below.


