
Install Latest TWRP Recovery 2.6.3.1 On A Samsung Galaxy S3
Samsung’s flagship device, the Galaxy S3 is quite the popular Android smartphone. The development of the Galaxy S3 is at its peak and there are a number of tweaks, custom ROMs and mods that you can use on the device to improve its performance. Before you do so, however, you are going to need to have flashed a TWRP Recovery 2.6.3.1 on it.
In this guide, we’re going to show your how to install the latest version of TWRP Recovery 2 on all the variants of the Galaxy S3. Before we begin, here’s a brief rundown of the reasons you want a custom recovery on a phone:
- So you can install custom ROMs and mods.
- So you can make a Nandroid backup and save the previous working state of your phone.
- Sometimes, to root your phone, you need to flash a SuperSu.zip file and SuperSu.zip needs to be flashed in custom recovery.
- You can wipe cache and Dalvik cache.
Prepare your phone:
- Make sure that your phone is a Samsung Galaxy S3.
- Check your device model number: Settings>More>About device.
- Make sure that your device’s battery has at least over 60 percent of its charge.
- Make sure that you’ve backed up all your important contacts, call logs, messages, and media content.
- You have an OEM data to establish a connection between your phone and a PC.
- You have turned off all anti-virus programs and firewalls.
- You have enabled USB debugging mode.
Note: The methods needed to flash custom recoveries, ROMs and to root your phone can result in bricking your device. Rooting your device will also void the warranty and it will no longer be eligible for free device services from manufacturers or warranty providers. Be responsible and keep these in mind before you decide to proceed on your own responsibility. In case a mishap occurs, we or the device manufacturers should never be held responsible.
Download:
- Samsung USB drivers
- Odin3 v3.09
- The appropriate TWRP Recovery for your device:
- TWRP Recovery 2.6.3.1 for Galaxy s3 GT- I9300 International
- TWRP Recovery 2.6.3.0 for Galaxy s3 GT- I9305 LTE
- TWRP 2.6.3.0 for Galaxy s3 GT- I9305T Telus
- TWRP 2.6.3.1 for Galaxy s3 SCH-I535 Verizon
- TWRP 2.6.3.1 for Galaxy s3 SGH-I747 AT&T
- TWRP 2.6.3.1 for Galaxy s3 SCH-R530 US Cellular
- TWRP 2.6.3.1 for Galaxy S3 SGH-T999 T-Mobile
- TWRP 2.6.3.1 for Galaxy s3 SPH-L710 Sprint
- TWRP 2.6.3.0 for Galaxy S3 Metro PCS
- TWRP 2.6.3.0 for Galaxy s3 SCH-R530 Cricket
- TWRP 2.6.3.0 for Galaxy S3 SGH-I747M Canada
Note: If your device has a locked bootloader (such as the Verizon Galaxy S3) unlock it first before you flash the custom recovery.
Install TWRP Recovery on your Galaxy S3:
- Open Exe.
- Put phone in download mode:
- Turn device off.
- Turn back on by pressing and holding the Volume Down + Home + Power buttons
- When you see a warning, press Volume Up
- Connect the phone to your PC.
- Wait for the ID:COM box inOdin to turn blue, that means phone is connected properly in download
- Click PDAtab in Odin and select downloaded tar file then let it load. Odin should look exactly as shown below with no extra options are selected.
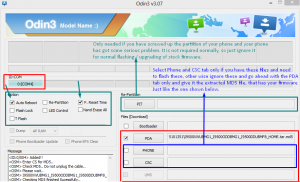
- Hit start, it will take a few seconds but the recovery should flash and your device will reboot.
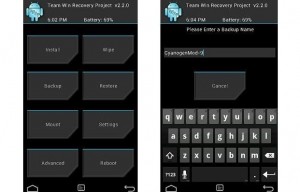
- Press and hold Volume Up + Home Button + Power Key to access the TWRP Touch Recovery
- You can now backup your current ROM. Also, before moving on to root the device, make sure you make an EFS backup and save it on your PC.
How to Root:
- Download zip file.
- Place downloaded file on phone’s sd card.
- Open TWRP Recovery and from there select Install > SuperSu.zip
- Reboot device and look for SuperSuin app drawer. If you find it, you’ve rooted the device successfully.
Have you installed a custom recovery on your Samsung Galaxy S3?
Share your experience with us in the comments box below.
JR


