Titanium Backup Tutorial
Titanium Backup is an app that allows you to backup and restore everything on your Android device. This is handy if you like installing tweaks, mods and custom roms on you Android device. If, for some reason something goes wrong in installation, you have a Titanium Backup which will let you restore your device and it’s system apps, user apps and app data easily. Titanium Backup can be done manually, or you can set a schedule on your phone for the backup to be created during set times.
Titanium Backup creates a folder in your phone’s internal storage and back’s up your data in the form of .zip files. You can also change the location of this back up folder to an external SD card.
Titanium Backup is available for free via the Google Play Store, but, you can also purchase Titanium Backup Key to unlock more features. In this post, were going to concentrate on the basic and free version of Titanium Backup.
How To Use Titanium Backup:
- First, you need to install Titanium Backup:
- Your device needs to be rooted so, if it isn’t already, root it.
- Download and install Titanium Backup. You can get it here on Google Play
- After you have installed Titanium Backup, go to your app drawer. Open Titanium Backup from there.
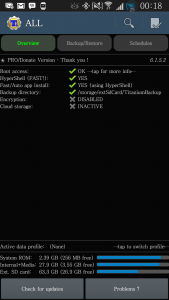
- You should see the main menu with the options: Over View, Backup/Restore and Schedules.
- Overview will show you the preferences/stats/status of your device.
- Backup/Restore will show you a list of all the installed and system apps. If you tap on an application, you will see the actions you can perform, such as run app, backup, freeze, wipe data, uninstall and delete

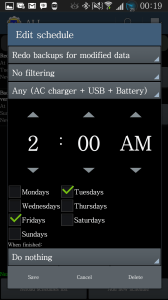
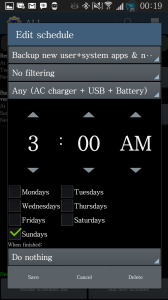
 Schedules show you the scheduling panel where you can set a time when you want a backup to be automatically made
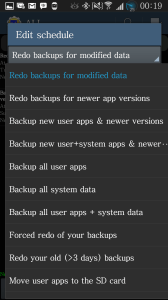
- Tap on the small tick mark that you see in Titanium Backup’s top left corner. This will take you to Batch Actions.
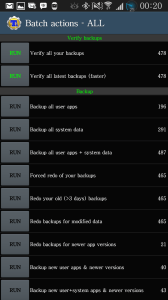
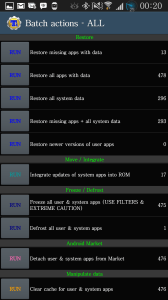
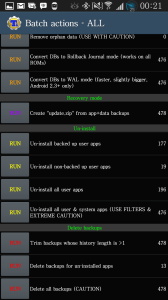
Aside from the actions in the main menu, you should also see the following:
- Verify Backups, which will let your know if your backup was performed properly
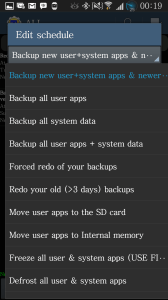
- Backup all user apps
- Backup all system data
- Backup all user apps + System data
- Backup new user apps
- Backup new user+system apps & newer version
- If you tap on the run button, you will see a list of the apps you have on your device. Select or unselect the apps you want to be part of the backup.
- The restore option will allow you to restore what you backed up. Tap the run button and select or unselect the apps you want restored.
- There is a move/integrate option. This allows you to integrate updates of the system apps in your device’s current OS or ROM.
- The freeze/defrost option allows you to freeze apps that are using a lot of memory or causing problems on your phone.
- The Android Market option lets you detach user and system apps from Google Play Store.
- Manipulate Data lets you do the following:
- Clear the cache of user and system apps
- Wipe the data of user and system apps
- Remove any orphan data
- Convert DBs to Rollback Journal mode
- Convert DBs to WAL mode
- In the recovery mode option, you can create an update.zip file that you can flash with a custom recovery.
- In Un-Install you can:
- Uninstall any backed up user apps
- Uninstall any non-backed up user apps.
- Uninstall all user apps
- Uninstall all user apps and system data
- In Delete Backups, you can:
- Trim the backups
- Delete the backups for apps you have uninstalled
- Delete all the backups.
Titanium Backup Settings:
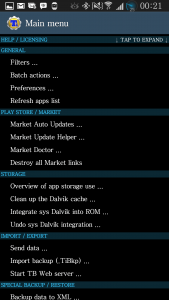
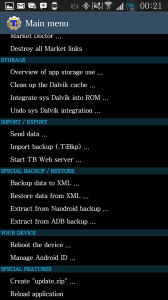
- General:
- Filters: This lets you filter what apps you want displayed in the Titanium Backup options
- Batch Actions: As explained above.
- Preferences: You can choose to enable cloud services, enable backup encryption, backup settings
- Play Store:
- Automatic updates
- Update helper
- Market links manager
- Storage:
- Clean Dalvik cache
- Overview of app storage use
- Integrate and undo system
- Dalvik integration
- Import/Export
- Send data
- Import backup
- Start Titanium Backup Web Server
- Special Backup/restore:
- Backup/restore data to and from XML
- Extract from a Nandroid Backup
- Extract from ADB Backup
- Your device
- Reboot device
- Manager android ID
- Special features
- Create update.zip file
- Reload app
- When you open Titanium Backup, it will create a folder called Titanium Backup on your chosen location. You can then copy this folder to a PC.
- To run Titanium Backup, just tap the folder.
Have your installed and begun using Titanium Backup?
Share your experience in the comments box below.
JR
[embedyt] https://www.youtube.com/watch?v=VY65v8vO3AE[/embedyt]

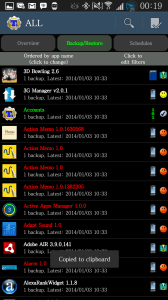
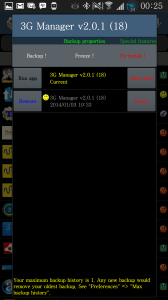 Schedules show you the scheduling panel where you can set a time when you want a backup to be automatically made


I’m impressed, I have to admit.
Your guide was good and precise
Cheers!
Excelente espero poder desinstalar más de una app que me trae atareado, gracias !!!
Guten Morgen, diese Erklärungen sind, wie ich verstanden habe, für die Verwendung auf einem Android-Handy bestimmt.
Es ist das gleiche, in Auto Stereo zu installieren?
Ich möchte Android 9 oder 10 installieren, um Android 7.1.2 zu ersetzen, das ich noch in meinem Auto habe
Ich danke dir sehr
Surely you can try.