Learn how to backup and restore your Android device with the following guide. This step-by-step tutorial will help you back up your data on your Android device with ease.
Backing up your contacts, call logs, and text messages from an Android device is crucial, especially if you frequently switch phones or make custom ROM modifications. By ensuring that your important data is regularly backed up, you can have peace of mind knowing that your information is secure and protected.

Previously, we provided tutorials on how to backup essential data such as contacts, call logs, and SMS messages. Since they were individual guides, they proved helpful to both power users and the average Android user seeking to secure their data.
After hearing feedback from our viewers, we realized that they desired a more streamlined approach to backing up all data at once as opposed to following various methods for every type of data. During our search for a more convenient approach, we came across the Easy Backup & Restore application, which aptly delivers on its name by providing a comprehensive backup and restore solution.
Summary:
Through the use of Easy Backup & Restore, it is possible to securely backup vital data such as contacts, call logs, SMS messages, MMS, calendar entries, bookmarks, and dictionary hits without requiring root access.
With just a few straightforward taps, it’s easy to backup the essential data mentioned above using this application without any complications. Having personally tested this application, we can confidently attest to its reliable functionality and effectiveness.
In this guide, we will walk you through a detailed, step-by-step process for backing up and restoring critical data using the highly effective Easy Backup & Restore application. Our focus will be on safeguarding vital call logs, contacts, SMS messages, and other valuable data. So, let’s proceed with the backup and restore process using this powerful tool.
Easy Backup & Restore provides an app backup feature, though it does require root access to utilize. As we have previously discussed app backup in our Titanium Backup guide, we will solely focus on the backup and restore process for SMS messages, contacts, call logs, and other related data in our upcoming post.
Backup Everything with Ease: Easy Backup & Restore Guide
- You can download and install the Easy Backup & Restore application on your Android phone.
- Access the Easy Backup & Restore application from your app drawer.
- Tap on the Backup button, which appears as the first option on the screen.
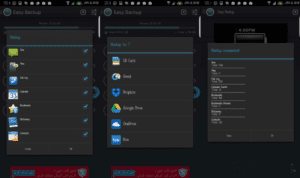
- Choose what you want to backup from the available options such as SMS, MMS, call logs, calendar, bookmarks, dictionary, and contacts.
- It is recommended to backup SMS messages, call logs, bookmarks, and contacts. Ensure these options remain ticked while unselecting all other options.
- Select “OK” and then choose where you would like to save the backup file. You have the option to save it on your SD card, share it via email, or upload it to Dropbox, Google Drive, and other similar platforms.
- Once you have selected your desired backup location, the application will generate a backup file and save it accordingly. Once the backup process is complete, you will receive a detailed summary log, displaying how many SMS messages, call logs, and contacts have been successfully backed up.
- After you have completed the backup process, it is advisable to transfer the backup file either to your computer or a cloud-based storage service. This precautionary step ensures that your important data remains protected in the event of a phone storage wipe or loss.
- And that concludes the process.
Restore Everything Easily: Easy Backup & Restore Guide
- Ensure that you have created a backup using the Easy Backup & Restore application beforehand.
- To proceed with the restoration process, locate and open the Easy Backup & Restore application from your app drawer. In case you haven’t installed it yet, kindly consider installing it first.
- Once the application launches, select the “Restore” option.
- Next, select the specific location from which you want to restore your data.
- Now, select the backup file which you want to use for the restoration process.
- Wait for the restore process to complete.
- And that’s it. Your data should now be successfully restored.
That concludes the process of using Easy Backup & Restore. We sincerely hope that this guide proves to be of assistance to you.
Feel free to ask questions concerning this post by writing in the comment section below.


