If you are experiencing an Android firmware issue with Oreo in Odin on your Samsung device, there are steps you can take to resolve the issue.
Samsung released Oreo updates for Galaxy S8 and S8+, with features like Picture-in-Picture and a redesigned Settings app. However, some users are unable to install Oreo Firmware using Odin, as it freezes up when loading files. To help, we’ve prepared a tutorial to Fix the Oreo Firmware Installation Issue in Odin for Samsung.
XDA Senior Member Murtaza02 has shared a method to resolve the Oreo Firmware Installation Issue in Odin. Samsung added a new file with the .lz4 extension, causing complications, but murtaza02 found a way to bypass it and flash the Oreo Firmware file through Odin. Let’s see how.
Problem with Android Firmware Oreo Installation in Odin
To fix the Oreo Firmware Installation Issue in Odin for Samsung devices, follow the instructions below carefully. The steps are simple, so you won’t mess up if you follow them as stated. Ensure that you have everything required (check the list below).
Required Components:
- Galaxy S8/S8+ (G950F / G950FD / G955F / G955FD).
- Modded version of 7Zip which can open .lz4 files. Download.
- Prince Comsy’s modified Odin. Download
- You need to find the correct CRAP ROM. Here
- Windows PC.
Resolve Oreo Firmware Issue in Odin for Samsung Devices:
- Download and install 7zip on your Windows PC.
- Download and extract firmware files, which will give you 5 files named AP, BL, CP, CSC_OXM, and HOME_CSC_OXM.
- All extracted files will be in .tar.md5 extension. The tricky and hectic part begins now.
- Rename all files and remove the .md5 extension from their names, turning them into .tar files.
- After renaming the files, extract each .tar file using 7zip into separate folders – make sure to extract them into separate folders to avoid mixing them up.
- From each extracted file, you’ll get a folder and a few files. Extract the .lz4 files by right-clicking and selecting “7-zip Zstandard” -> “Extract here”.
- After extracting all the .lz4 files, you’ll have the original files that are compatible with Odin. You can now delete or move the .lz4 files.
- Repeat the same process with all five files extracted from the firmware.
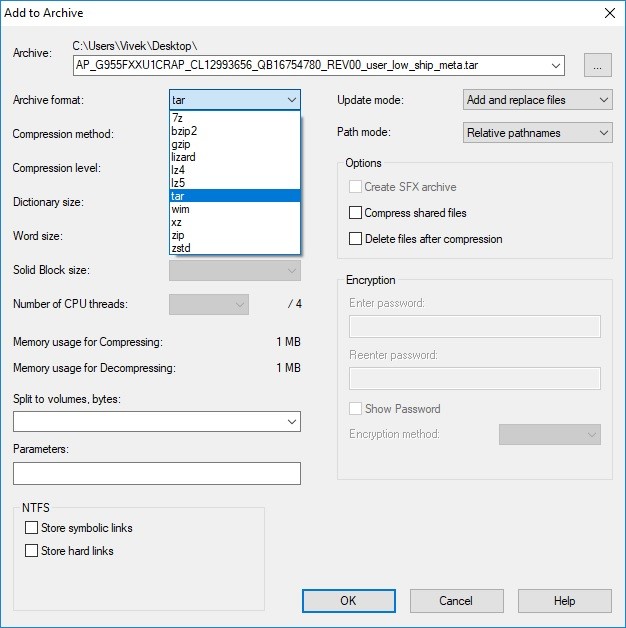
- After extracting all the .lz4 files, select all files and the metadata folder, right-click, and select “7-zip Zstandard” -> “Add to archive”.
- Rename the files back to their original names to ensure compatibility with Odin. For example, save the AP file as AP_G955FXXU1CRAP_CL12993656_QB16754780_REV00_user_low_ship_meta.tar and select the archive format as tar.

- Repeat the same process for all files, which shouldn’t take long. Once done, use Odin to flash all the files.
This concludes the process.
Feel free to ask questions concerning this post by writing in the comment section below.


