Samsung Galaxy S3 GT-I9300
An Android 4.3 update was released by Samsung for their Galaxy S3 recently. This update contains some bug fixes and makes some performance enhancements and core UI changes. It also adds Galaxy Gear support and some other features.
In this post we are going to show you how you can install a Custom Recover and then root a Galaxy S3 after the Android 4.3 Jelly Bean update.
Prepare your phone:
- This guide will only work with a Galaxy Note S III GT-I9300. Check your device model by going to Settings>General>About Device
- Charge your Samsung Galaxy S3 device so that it has 60 percent of its battery life. This is to prevent it from running out of power before the process completes.
- Have your OEM data cable to connect your device and your PC.
- Back up SMS messages, contacts, call logs, and important media files.
- Enable USB debugging mode by going to Settings>General>Developer Options.
Note: The methods needed to flash custom recoveries, roms and to root your phone can result in bricking your device. Rooting your device will also void the warranty and it will no longer be eligible for free device services from manufacturers or warranty providers. Be responsible and keep these in mind before you decide to proceed on your own responsibility. In case a mishap occurs, we or the device manufacturers should never be held responsible
Download:
- Odin3 v3.10. Install it on PC.
- Samsung USB drivers
- Philz Advanced CWM recovery.tar.md5 file –here.
- SuperSu v1.69 – here
Install CWM Recovery:
- Put the device into download mode by pressing and holding the volume down, home and power keys. When you get a screen with a warning asking if you want to continue, press the volume up key to continue.
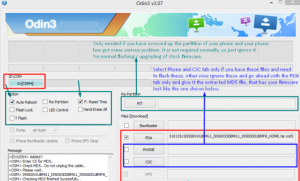
- Connect device to PC. Odin should automatically detect it and the ID:COM box should turn light blue.
- Click the PDA tab on Odin. Select the .tar.md5 file you downloaded.
- Check that the options in your Odin match those in the photo below

- Click start to begin the rooting process.
- You should be able to follow your progress in the process bar on Odin. When it finishes, your phone will automatically restart.
- If you want to go to recovery, hold the volume up, home and power keys at the same time.
Root:
- Place the SuperSu.zip file you downloaded to the SD card of your device/
- Boot into recovery.
- Choose “install zip>chose zip from sd card>select SuperSu.zip”. This will start the installation process.
- Reboot your device afterwards.
- Check that you have SuperSu in your App drawer.
Have you installed a custom recovery and rooted your Galaxy S3?
Share your experience in the comments box below.
JR
[embedyt] https://www.youtube.com/watch?v=9MrGtb8FNXY[/embedyt]


