 And Root The Samsung Galaxy Grand 2 SM-G7102")
Installing A Custom Recovery (CWM/TWRP)
Installing a custom recovery on your Samsung Galaxy Grand 2 SM-G7102 will allow you to do a lot of things that will take your device beyond the manufacturer’s limits.
A custom recovery will allow you to:
- Install custom roms
- Create a Nandroid back up
- Root your phone
- Wipe cache and dalvik cache.
In this guide, we’re going to show you how to install two types of popular and good custom recoveries on a Galaxy Grand 2 SM-G7102. These are ClockworkMod (CWM) and TWRP recovery. We will also show you how to root your device once you have a custom recovery installed.
Prepare your phone:
- This guide is only for a Galaxy Grand 2 SM-G7102. Do not use it with other devices. Check what your device is by going to Settings>More/General>About Device or Settings> About Device
- Charge your battery so that it has 60 percent of its life.
- Have an original data cable that you can use to connect your phone and a PC
- Have a backup of your mobile’s EFS data.
- Back up all your important messages, contacts, and call logs.
- Turn off or disable Samsung Kies and any Anti-Virus software you have. These can interfere with the functioning of Odin 3 which you need during this process.
Note: The methods needed to flash custom recoveries, roms and to root your phone can result in bricking your device. Rooting your device will also void the warranty and it will no longer be eligible for free device services from manufacturers or warranty providers. Be responsible and keep these in mind before you decide to proceed on your own responsibility. In case a mishap occurs we or the device manufacturers should never be held responsible.
Download:
-
.
- Download and Install Samsung USB drivers
Either of the following
- CWM-6.0.4.9-ms103g-Beta.tar Link 2 . for Galaxy Grand 2 SM-G7102
- twrp_ms013g-build2.tar [ Link 2 ] for Galaxy Grand 2 SM-G7102
How to install CWM/TWRP
- Open Oding3.exe on your PC
- Put your phone into download mode by first turning it off and then waiting for 10 seconds. Turn it back on by pressing and holding the volume down, home button, and power key at the same time. When you see a warning, let go and then press volume up to continue.
- Connect your phone and the PC.
- When Odin detects your phone, the ID:COM should turn blue.
- If you have Odin 3.09, hit the AP tab. If you have Odin 3.07, hit the PDA tab.
- From the AP/PDA tab, select the recovery.tar file that you downloaded.
- After selecting the file, all other options should remain the same. To make sure, compare your Odin to the photo you see below:
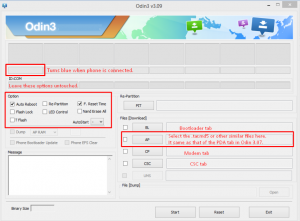
- Hit start and wait for the recovery to flash. When it finishes, your phone should restart.
- When your phone restarts, remove it from your PC.
- Boot into recovery mode by turning off the device and then turning it back on by pressing and holding the volume up, home and power keys.
How to Root Galaxy Grand 2 Duos:
- Download Root Package.zip file[ UPDATE-SuperSU-v2.02.zip ]
- Copy the downloaded fileto your phone’s SD card.
- Boot your phone into recovery mode.
- Select “Install > Choose Zip from SD card > Root Package.zip > Yes / Confirm”.
- The Root Package will flash and you should gain the root access on your Galaxy Grand 2.
- Reboot your device.
- Find SuperSu or SuperUser in the App Drawer.
How to Verify Root Access now?
- Go to the Google Play Store on your Galaxy S4 Mini Duos.
- Find “Root Checker “and install.
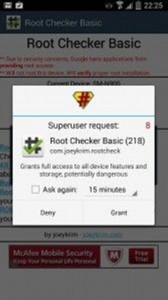
- Open Root Checker.
- Tap “Verify Root”.
- You will be asked for SuperSu rights, tap “Grant”.
- You should now see: Root Access Verified Now
Have you installed a custom recovery and rooted your Galaxy Grand 2 Duos?
Share your experience in the comments box below.
JR
[embedyt] https://www.youtube.com/watch?v=ognJcR8xUvM[/embedyt]


: Flash CyanogenMod 14.1 with Android 7.1 Nougat")
