Easily Root Any And All Android Devices
One of the great things about Android is the way its open source nature allows users to customize their device. The first step and Android user needs to take to make full use of their Android device is to root it.
When you root an Android device, you gain the root permissions of your device. This allows you to get access to all system files and the apps.
If you want to root your Android device, there are many tools and scripts you can use to do so. In this post, we’ve gathered a list of the many popular and easy rooting techniques out there. Take a look at them and choose the one that will best suit your needs and your device.
- CF-Auto-Root
This is a Samsung-exclusive method so if you don’t have a Samsung Android smartphone, best look at the other methods we have here.
Download:
- Samsung USB drivers – download and install this onto a PC
- Odin3 v3.10. – download and extract onto your PC
- CF-Auto Root
How to use:
- Open Odin
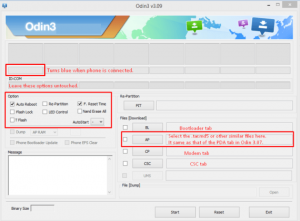
- You should find either a PDA or an AP tab on Odin. Select one of these.
- From the open tab, select CF-Auto-Root tar. File.
- Tick F. Reset Time and Auto-reboot. Leave all other options untouched.
- Make sure that USB debugging is enabled in your Samsung device,
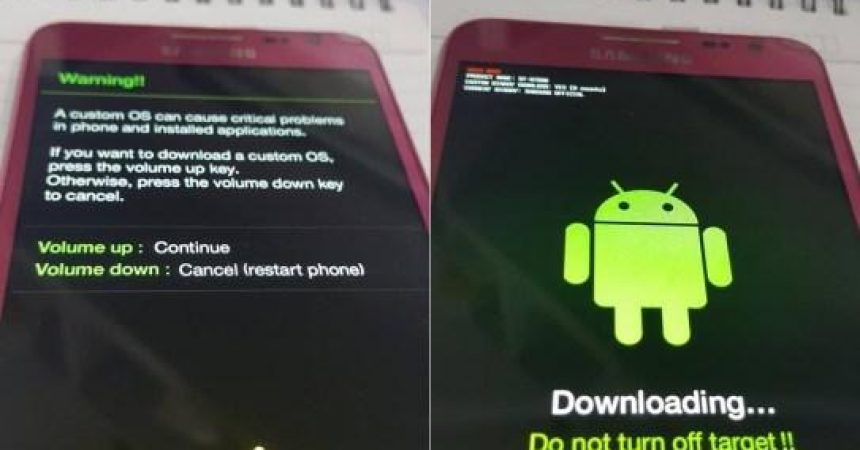
- Place your Samsung device into download mode by first turning it off completely and then turning it back on by pressing and holding the volume down, home and power buttons. When you see a warning, press volume up.
- While in download mode, connect your device to your PC. Odin should detect it automatically. When Odin detects your device, you will see either a blue or a yellow light the indicator found in the ID:COM box.

- When you are sure that your device is properly connected, click the Start button.
- Odin should begin flashing CF-Auto-Root. When flashing is through, your device will automatically reboot.
- Disconnect the device and wait for it to tune on completely.
- Go to the app drawer and check for SuperSu.
- You can also check that your device is rooted by going to the Google Play Store and downloading and installing the Root Checker application
Rooting unsuccessful?
- Follow Steps 1 and 2 from above.
- On the third step, untick Auto-Reboot. This means that your only selected option should now be F. Reset Time.
- Flash CF-Auto-Root following the steps above.
- Once flashing is finshed, reboot you device manually.
- Verify root access.
2. Installing Super SU Package from Custom Recovery
One of the most efficient and easiest rooting methods, Just make sure you have a custom recovery installed – or install one, and install a Super Su package from there. Download
Latest SuperSu package here.
How To Use:
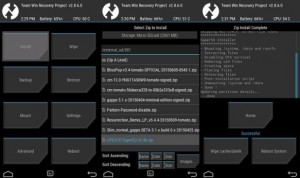
- After installing a custom recovery, reboot into recovery mode.
- In recovery mode, click the Installbutton
- Select SuperSU zipfile

- Confirm installation
- Wait for installation to finish and then reboot your device.
- Check that you have the SuperSu app in your app drawer. You are now rooted.
- KingRoot Tool
This is a one-click tool and one of the best one’s out there. It can be used with many Android devices and flagships. You use this tool with a Windows PC.
Download:
KingRoot Tool: here
Note: There are two versions of this tool, one for mobile and the other for desktop. Either of these versions will do. If you don’t already have custom recovery however, you might prefer the desktop version as it will also install a custom recovery in your device.
How to use:
Mobile Version.
- Install the app on your mobile and run it.
Desktop Version
- Install the app on desktop.
- Connect device to PC and open app.
- Tap开始root to start rooting process.
Have you rooted your device?
Share your experience in the comments box below.
JR
[embedyt] https://www.youtube.com/watch?v=AWNykj-lb-I[/embedyt]


![How-To: Root The Sony Xperia Z1 Compact 14.4.A.0.108 Firmware [Locked Bootloader] How-To: Root The Sony Xperia Z1 Compact 14.4.A.0.108 Firmware [Locked Bootloader]](https://www.android1pro.com/wp-content/uploads/2015/08/sony-xperia-z1-compact-138174-270x225.jpg)


