Rooting the Galaxy E7 Series
Samsung’s Galaxy E7 series is highly popular with users worldwide. Samsung made some changes to the plastic build and design that make it “cooler” in the eyes of users. They now have a metallic build and a great look and feel. They also have some pretty good specs.
Out of the box, the Galaxy E7’s run on Android 4.4.4 Kitkat. If you have one of these devices and you want to unleash it’s true power, you’re probably looking for a way to gain root access. Gaining root access means you can install and apply a lot of customized tweaks and ROMs to your E7.
In this guide, were going to show you how you can root several versions of the Galaxy E7. Specifically we are going to show you how to root a:
- Galaxy E7 E700
- Galaxy E7 E7009
- Galaxy E7 E700F
- Galaxy E7 E700H
- Galaxy E7 E700M
Follow along.
Prepare your phone:
- This guide and the method in it will only work if you have one of the five variants of the Galaxy E7 listed above. Check you device’s model number by going to Settings > More/General > About Device or Settings > About Device.
- Charge your battery so it has at least 60 percent of its power.
- Have an OEM data cable on hand to connect your device and a PC or laptop.
- Back up everything. This includes SMS messages, contacts, call logs and any important media files.
- Turn off Samsung Kies and any antivirus or firewall software first.
Note: The methods needed to flash custom recoveries, roms and to root your phone can result in bricking your device. Rooting your device will also void the warranty and it will no longer be eligible for free device services from manufacturers or warranty providers. Be responsible and keep these in mind before you decide to proceed on your own responsibility. In case a mishap occurs, we or the device manufacturers should never be held responsible.
Download
- Odin3 v3.10.
- Samsung USB drivers
- The appropriate CF-Auto-Root file for your device version
How To Root:
- Extract the CF-Auto-Root zip file you downloaded. Find the .tar.md5 file.
- Open Odin
- Put your device into download mode. Turn it off and wait 10 seconds. Turn it back on by pressing and holding the volume down, home and power buttons at the same time. When you see a warning, press volume up.
- When you device is in download mode, connect it to the PC.
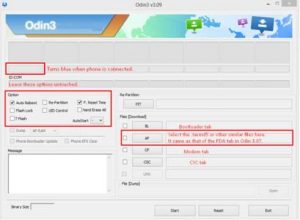
- If you make the connection correctly, Odin should automatically detect your device. If the ID:COM box turns blue, then the connection was made correctly.
- Hit the AP tab. Select the CF-Auto-Root tar.md5 file.
- Check that the options in your Odin match the ones in the pic below

- Hit start and then wait for rooting process to finish. When your device restarts, disconnect it from the PC.
- Go to your app drawer, check if SuperSu is there.
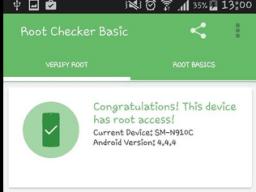
- Another way to verify that you have root access is to go to the Google Play Store and download and install Root Checker.
- Open Root Checker then tap Verify Root. You will be asked for Super Su rights. Tap Grant.
- You should now get the message Root Access Verified Now.

Have you Rooted your Galaxy E7 ?
Share your experience in the comments box below.
JR
[embedyt] https://www.youtube.com/watch?v=KENkVswvAnU[/embedyt]


