
Samsungs Galaxy Tab S2
Samsung launched their Galaxy Tab S2 in July of this year. Just like the first Galaxy Tab S, the Tab S2 came in two variants, a 8.0 inch and a 9.7 inch version. In this post, we will be concentrating on the 9.7 inch version which comes in model numbers T810 and T815.
The Galaxy Tab S2 9.7 originally ran on Android 5.0.2 Lollipop and one variant has already received an update to Android 5.1.1 Lollipop.
If you have a Galaxy Tab S2 9.7 and you want to go beyond the boundaries Samsung place and access the true open source nature of Android, you are going to need to have root access and a custom recovery installed. In this post, were going to show you how you can root your device and install TWRP recovery on it.
Prepare your device:
- This guide is only for use with the Galaxy Tab S2 9.7 SM-T810 and SM-T815.
- Charge the device’s battery to at least up to 50 percent.
- Have an OEM data cable to make the connection between your device and a PC.
- Back up your important contacts, SMS messages and call logs. Back up any important media files by copying them to a PC or Laptop.
Note: The methods needed to flash custom recoveries, roms and to root your phone can result in bricking your device. Rooting your device will also void the warranty and it will no longer be eligible for free device services from manufacturers or warranty providers. Be responsible and keep these in mind before you decide to proceed on your own responsibility. In case a mishap occurs, we or the device manufacturers should never be held responsible.
Download:
- Samsung USB drivers
- Odin3 v3.10.
- The appropriate TWRP file for your device model:
- If you are running on Android 5.1.1 Lollipop already, download a custom kernel.tar file
- The appropriate CF-Autoroot file for your device:
Install TWRP Recovery and Root
- Open Odin3.
- Enable OEM Unlockon your device by going to settings > about device. Look for and tap the build number 7 times to enable developer options. Go back to settings and open developer options. Under developer options, find and turn on “OEM unlock.“
- Put your devicein download mode by first turning it off completely and turning it back on by pressing and holding down the Volume Down, Home and Power buttons. When the device boots up, press Volume Up button to continue.
- Connect device to PC. Check the ID:COM box located on the top-left corner of Odin3. If it turns blue your phone is connected properly.
- Click the “AP”tab and chose the downloaded TWRP recovery.tar. Wait for Odin3 to load the file.
- Check the options on your Odin. The only option ticked should be F. Reset Time
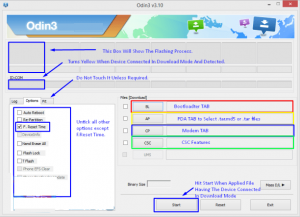
- Click the start button to flash recovery. When the ID:COM box has a green light, flashing is finished.
- Disconnect your device and turn it off.
- Boot your device into recovery mode by pressing and holding down the Volume Up, Home and Power buttons.
- Repeat step 3 to put your device back in download mode.
- Connect your device to the PC again.
- If you have a device running Android 5.1.1, open Odin again and repeat steps 5 and 6 for the Custom.kernel.tar
- Repeat steps 3-8 this time using the CF-Autoroot.tar file that you downloaded.
- Reboot your device.
- Check that you have SuperSu in your app drawer.
- Find and install BusyBoxfrom the Google Play Store.
- Verify root access withRoot Checker.
Have you installed TWRP and rooted your device?
Share your experience in the comments box below.
JR


Steps were easy to follow and implement.
Thanks!