
Install ROM on your Android
You can install ROM’s on Android devices in a quick and safe way and here is how it is done.Android’s operating system is open source in nature. This makes it possible for anyone to view the device’s code and modify it. This way, you can also install an updated version of the operating system. This also works in operating systems found in Linux-based desktop computers.
Why do people install ROMs? This gives them access to new features and allows them to alter their devices to suit their needs. Being able to install custom ROMs will also permit you to harbor certain applications or interfaces from other manufacturers to another device. You can install, for example, HTC’s Sense UI to Samsung devices. Installing custom ROMs can also allow you to update your Android fast! No need to wait long for a new release, simply download the ROM Manager app from Android Market and start installing new ROMs.
To start, you should root your mobile device using any of these: SuperOneClick, Z4Root or Universal Androot. However, before selecting and gaining root access, you need to check whether your device is compatible or not. So here are a few steps to follow:
You can use any of the three but for the sake of example, we’re going to use Z4Root. Download it right here as it may not be available elsewhere. It will require you to first, register before downloading the .apk file. Once you have downloaded it, copy the file to your SD card and install with the use of the ‘Easy Installer’ app or just simply click on it from the file manager.
Once an installation is done, you can now open the Z4Root then click on the button at the center which says ‘Root’. A bottom bar will appear and will update you on the progress of the process. As soon as the process is done, your device will restart and there you have it, you have gained root access!
When you have rooted your mobile phone, backing up your phone, installing custom recovery and downloading new ROM will be effortless with the help of the ROM Manager. You may even revert back to the old ROM. This tutorial will aid you in learning the step by step process of doing so.
Disclaimer
Rooting and installing ROMs to your phone may disqualify you from your warranty. You may follow this procedure at your own risk. we will not be responsible for any damage or loss.
-
Install ROM Manager app
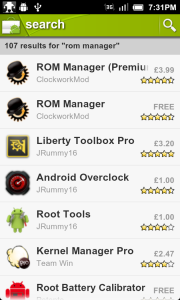
The first step in this process is to install the app, ROM Manager. This comes for free. There is a premium version, though, which has more features to offer. Moreover, you can download the ROM Manager from the Android Market. Search for it from the apps list, click on the icon and simply install.
-
Install Clockwork Recovery
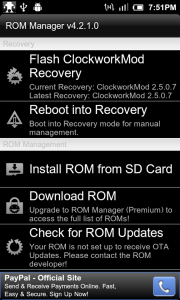
Once you have already rooted your Android phone, this software called, ‘custom recovery’ may have also been installed. ROM Manager makes sure you have and will check if it is the latest version or not.
-
Backing up ROM (Part 1)
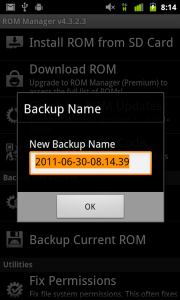
Go to the Backup Current ROM button from the ROM Manager and assign a name to the backup. It can be ‘Standard ROM Backup’ or whatever name you want to give it. When you have finished assigning a name, click OK. It may be prompt you to allow superuser access which you may have to grant.
-
Backing up ROM (Part 2)
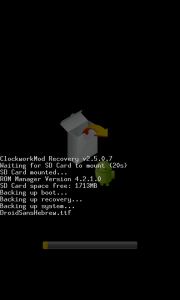
Your device will restart to its recovery mode automatically. There are two things to note while backing up your ROM. First is to make sure you are not expecting a call as the process may take a while. Also, do not format your microSD card since the recovery will back up your ROM to that destination.
-
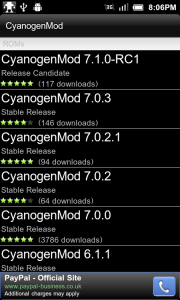
Choosing your ROM
Going back to the ROM Manager, you will find the ‘Download ROM’. Clicking on it will give you a list of ROMs that will be available for your phone. For the sake of example, we will utilize the CyanogenMod 7 which is one of the most commonly used versions for the reason that it’s stable and has broad device support.
-
Downloading ROM
Select CyanogenMod for download, the latest of which, as of the moment is the version 7.1.0-RC. Stay clear from those ‘Nightly’ builds. They are usually just experimental. Google apps are not always the standard, so just click and download.
-
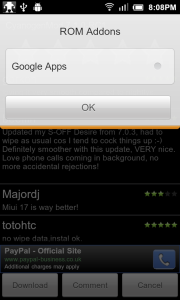
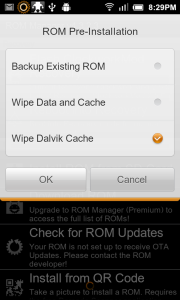
Install ROM (Part 1)
When you have finished downloading the Google Apps as well as the ROM, open the ROM Manager again and a pre-installation screen will come up. Find the ‘Wipe Dalvik’ and ‘Wipe Data and Cache’ boxes and click on them. Hit an OK button and your phone will restart to its recovery.

-
Install ROM (Part 2)
The installation of the fresh ROM will begin. It will take a while but once completed, the device will restart again. The first boot of the device may take up to 15 minutes. Relax and do not panic when it seems like the device may have frozen.
-
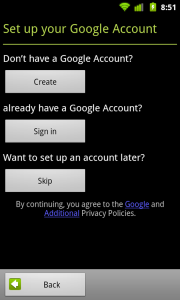
Set up a Google Account
You will be prompted to set up a Google account when the booting is finished. As soon as you’ve entered your Google account, all your settings, apps, as well as contacts, will be synced back to the phone. Then you can enjoy your new ROM.
-
Optional Calibration of Battery
You may also want to calibrate the battery by charging the device to the full battery while it is on. Next procedure is to turn it off and disconnect it from the power supply. The device may then be reconnected to the power supply until its light goes green. Disconnect it again and turn it back on. Turn off the device again and reconnect to the power supply until the light green turns on again.
What do you think about all of the above?
Share your experience in the comments section box below
EP
[embedyt] https://www.youtube.com/watch?v=RIi4KXgZYsI[/embedyt]


")


